Understanding the role light and heat play in the growth and health of your flock cannot be stressed enough. Getting your chicks is the easy part, but efficiently raising them is where it kind of gets tricky. Whether you are ordering your chicks online or raising them from eggs, lighting and heating are very crucial if you want to get your chicks’ survivability, health, and performance up.
In general, it takes about six weeks for a chick to become fully feathered and able to self-regulate its temperature. A mother hen and/or a brooder box are necessary to protect the hatchlings and provide both light and heat for baby chicks until they’re fully feathered.
Baby chicks must be maintained at a temperature higher than what is considered normal until they grow to an adequate size and possess enough feather coverage to regulate their temperature themselves. This process, called brooding, can be done with a mama chicken or in a brooder box. So let’s talk heat and light requirements – and how to help your chicks grow up healthy and strong.
Light Requirements to Keep Chicks Healthy
Chicks need prolonged exposure to certain light intensity to thrive and find their feed and water.
1- 3 day old birds require 22 – 24 hours of light. Some poultry keepers would advise you to turn the lights off briefly (at least for an hour and a half or so), for the first couple of days. Supposedly this is to get your chicks accustomed to dark periods. However, if your light source and your heat source come from the same bulb, then this is a bad idea. Just leave the lamp on 24/7 for a few days. Or, you know. Get a separate brooder heater source.
But if you are going to turn off the heat/light lamp for a couple of hours, then make sure you do it during the warmest part of the day – and keep an eye on how your chicks are reacting.
There are three lighting options you can use in your brooder. Below you’ll find the wattage specifications of each option and important lighting tips.
- Incandescent bulbs: These are the most stimulating for your chicks. Use a 60-watt incandescent bulb for every 200 square feet or a 25-watt one for every 10 square feet of your brooders floor space. This should be a good blend of both sufficient and efficient for whatever size batch of chicks you possess. This lighting option is also a very affordable heat source.
- Compact fluorescent bulbs: A 14-watt fluorescent bulb for every 200 square feet of your brooders floor space should be efficient as well, for any batch of chicks you have. If you decide to go with this option, then ensure the fluorescent bulbs you get have warm-white lights.
- Light-emitting diode bulbs: As for this lighting option, a 9-watt LED bulb should be just right for whatever number of chicks you have, make use of the square foot stated above when installing each bulb.
You can also improve the efficiency of the above lighting options by making use of reflectors with shallow domes or purchasing bulbs with inbuilt reflectors. The light intensity of each option listed above can also be affected by dust, so ensure you clean your bulbs from time to time. Shadows cast by objects in your brooder can also reduce the efficiency of your lighting.
If you don’t always remember to turn on and off the light in your brooder, employ the use of an automatic timer switch. This will help ensure that your chicks receive a uniform duration of light each day.
Pro tip: if you’re going to keep your brooder box inside (like a room or the garage), then you can just use the normal light sources in the room as long as you have a separate and closer heating source for the chicks.
Please keep in mind, though, that some of the various bulbs kept closest to chicks are more likely to become fire hazards. A friend of mine lost all of her chicks and part of her house recently. So please be careful – because even being careful isn’t a guarantee that you won’t experience a catastrophe.
Note: chickens do need dark, too, even if they don’t love it. You can read more about chickens and the dark in my article, Can Chickens See in the Dark? Are They Afraid of the Dark?
Heat Requirements for Baby Chickens
Baby chicks require a safe and efficient fireproofed heat source. The more your chicks grow, the harder and stronger they become. Over time, they’ll be able to handle a wider range of temperatures – but not right off the bat. Translation: you’re going to be adjusting the temperature of your brooder frequently. So be prepared for that.
From the first week of life, your birds should be subjected to a brooder temperature of about 90 – 95 degrees Fahrenheit (33 – 35 degrees Celsius). Over time, this temperature should be reduced each week by approximately 5 degrees Fahrenheit (3 degrees Celsius).
You should also keep in mind that the ability of your brooder to efficiently maintain adequate warmth can be affected by the room’s temperature. For instance, if you brood your chicks in a room with a notably low air temperature, then your chicks will have to stay in the brooder longer than chicks brooded in warmer conditions.
A room temperature of at least 50 degrees Fahrenheit (10 degrees Celsius) is really the minimum to efficiently make use of your brooders heat source. Luckily, most garages are at least 50 degrees, making them a great spot for brooders that can’t be kept indoors.
Here’s a table of the temperature requirements for a brooder.
| Duration | Temperature (Fahrenheit) | Temperature (Celsius) |
|---|---|---|
| Week 1 | 90-95 | 33 – 35 |
| Week 2 | 85 – 90 | 30 – 33 |
| Week 3 | 80 – 85 | 27 – 30 |
| Week 4 | 75 – 80 | 24 – 27 |
| Week 5-7 | 70 – 75 | 21- 24 |
| Week 8 | 65 – 70 | 18 – 21 |
| Week 9 | 65 minimum | 18 minimum |
There’s a range because the ideal temperature for layer breeds is 95℉ and it’s 90℉ for broiler breeds. Broiler breeds require less heat because they are larger, grow faster, and tend to self-regulate their temperature quicker. But I listed them in the other order because it would be weird to say that the temperature requirements vary from 95-90 degrees.
I’ve also noticed that chicks in cooler weather conditions seem to feather out much faster than chicks who grow up in warmer temperatures. This data is backed by other anecdotal evidence from other homesteaders I’ve talked to. In any case, chicks hatched in February seem to get older faster than chicks hatched in April.
Part of that is probably just how we observe time, but it is generally believed that the sooner you bring down the heat level, the faster it’d be for your chicks to become fully feathered.
As for the heat source of your brooder, there are a number of options for you to choose from. You can go with the commercial box brooders or you can go with the homemade setups that use various heaters, incandescent light bulbs, infrared heaters, heat lamps, and flat panel heaters.
Getting a heat source that possesses an adjustable thermostat would serve you better but if you can’t, you can always adjust the temperature of your heating source by either reducing/ increasing the wattage of your bulb or raising/ lowering the heat source.
Pro tip: Avoid using heat or light bulbs coated with polytetrafluoroethylene. These types of bulbs are extremely dangerous for your chicks as they emit toxic fumes when overheated which can kill or impair your chicks.
Personally, I’m a huge fan of the flat panel heaters. We’ve got a vertical flat panel heater for out in the coop (we only use it in inclement weather where there’s a severe drop in temperature) and we plan to use a horizontal brooder heater for future chicks. We used to use a heat bulb, but after my friend’s experience, we’ve discontinued that.
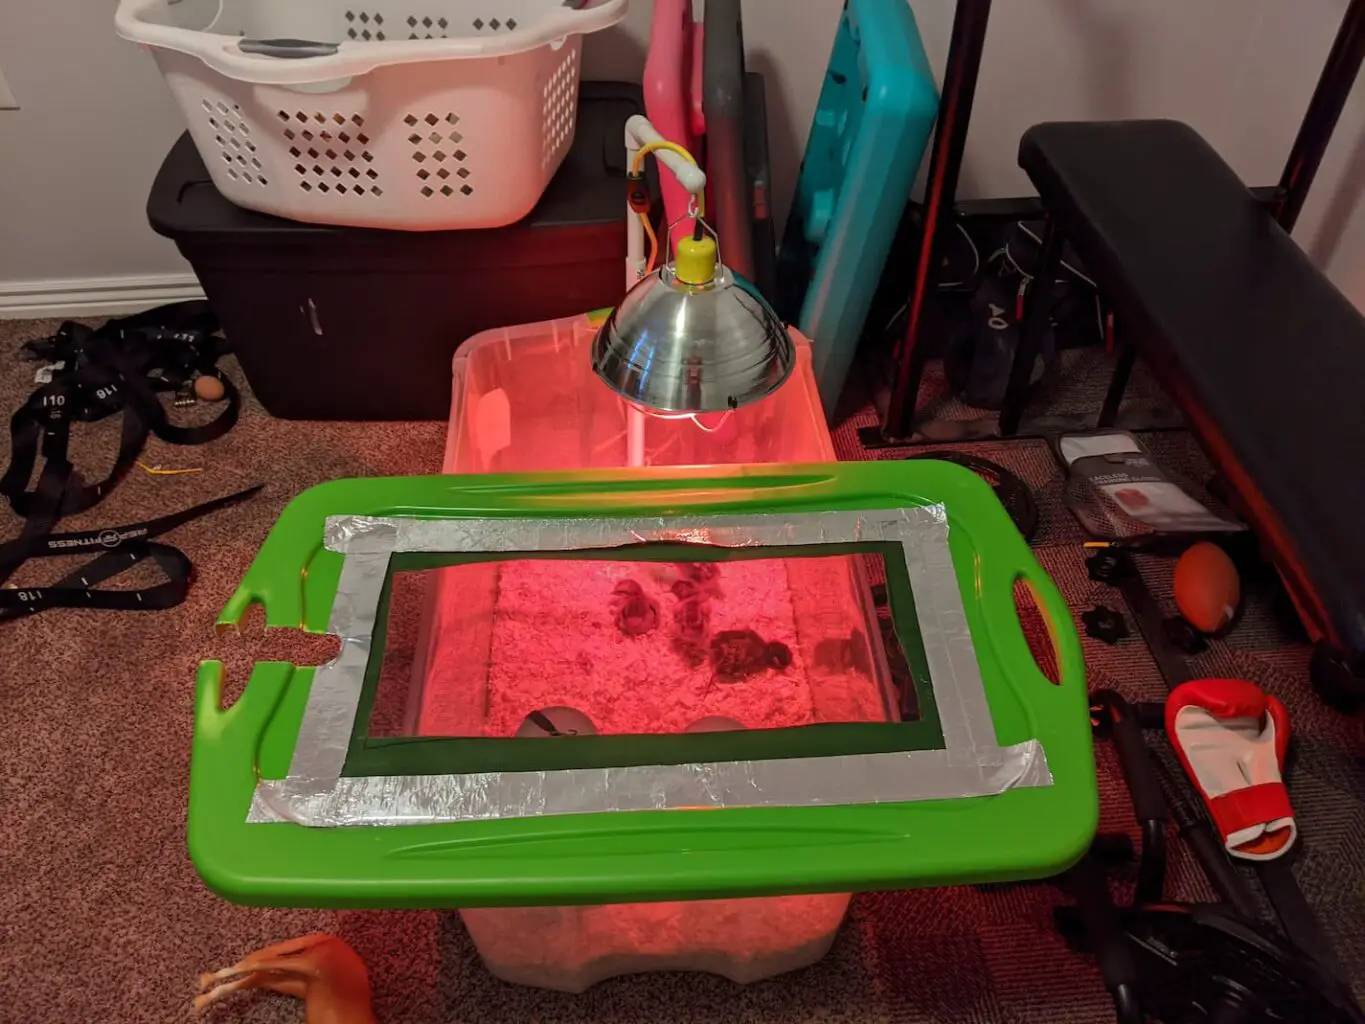
Even so, here’s a quick peek at what our old homemade brooder looked like. And yes, we totally kept it in an extra bedroom in the house. The heater lamp we used was one we picked up at the local feed store that came highly recommended by the staff.
Best Thermometers for Brooders
There are two types of thermometers well-suited for brooder boxes or coops. They are:
- Digital thermometers
- Traditional glass and mercury thermometers
Any glass and mercury thermometer should do just fine in helping you accurately maintain the temperature in your brooder. However, mercury is a known toxin so these kinds of thermometers are getting harder and harder to find. Because liquid mercury is just too fun to play with – for a poison.
Digital thermometers like the ones found in terrariums are therefore a much better option for brooding because they are super easy to read, less fragile, and are almost impossible for your chicks to peck at. Plus the whole lack of poisonous heavy metals is a huge perk.
To effectively measure the temperature in your brooder, place your thermometer 2 inches (5cm) above the brooder floor and at the outer edge of your hover to get an accurate reading.
But if you don’t want to get a thermometer? You totally don’t have to. We don’t use one – so now let me tell you how to go thermometer-less. Because even if you do buy a thermometer, you need to know how to read chicks’ behavior to adjust the temperature. That’s because chicks don’t know about the temperature table guidelines, so they don’t always follow them.
How to Measure Heat and Light without a Thermometer
Thermometers aren’t a must because the behavioral changes and body language of our chicks (and the noises they make) totally tell us when the temperature is fine – and when it isn’t.
Here’s what to look out for in your chicks according to the two temperature extremes.
When the temperature is too high your chicks would most likely stay as far away as they can from the heat source.
They will spread out across the brooder and, if you observe them more closely, you might even notice them panting. Chicks that are too hot will be silent with, in some cases, drooping heads. Too-hot chicks eat less, which would result in them growing slower. They can also develop problems like diarrhea, pasty butt, and dehydration.
You can lower the temperature by raising the heat source higher, reducing the wattage of your bulb, or reducing the temperature on the thermostat.
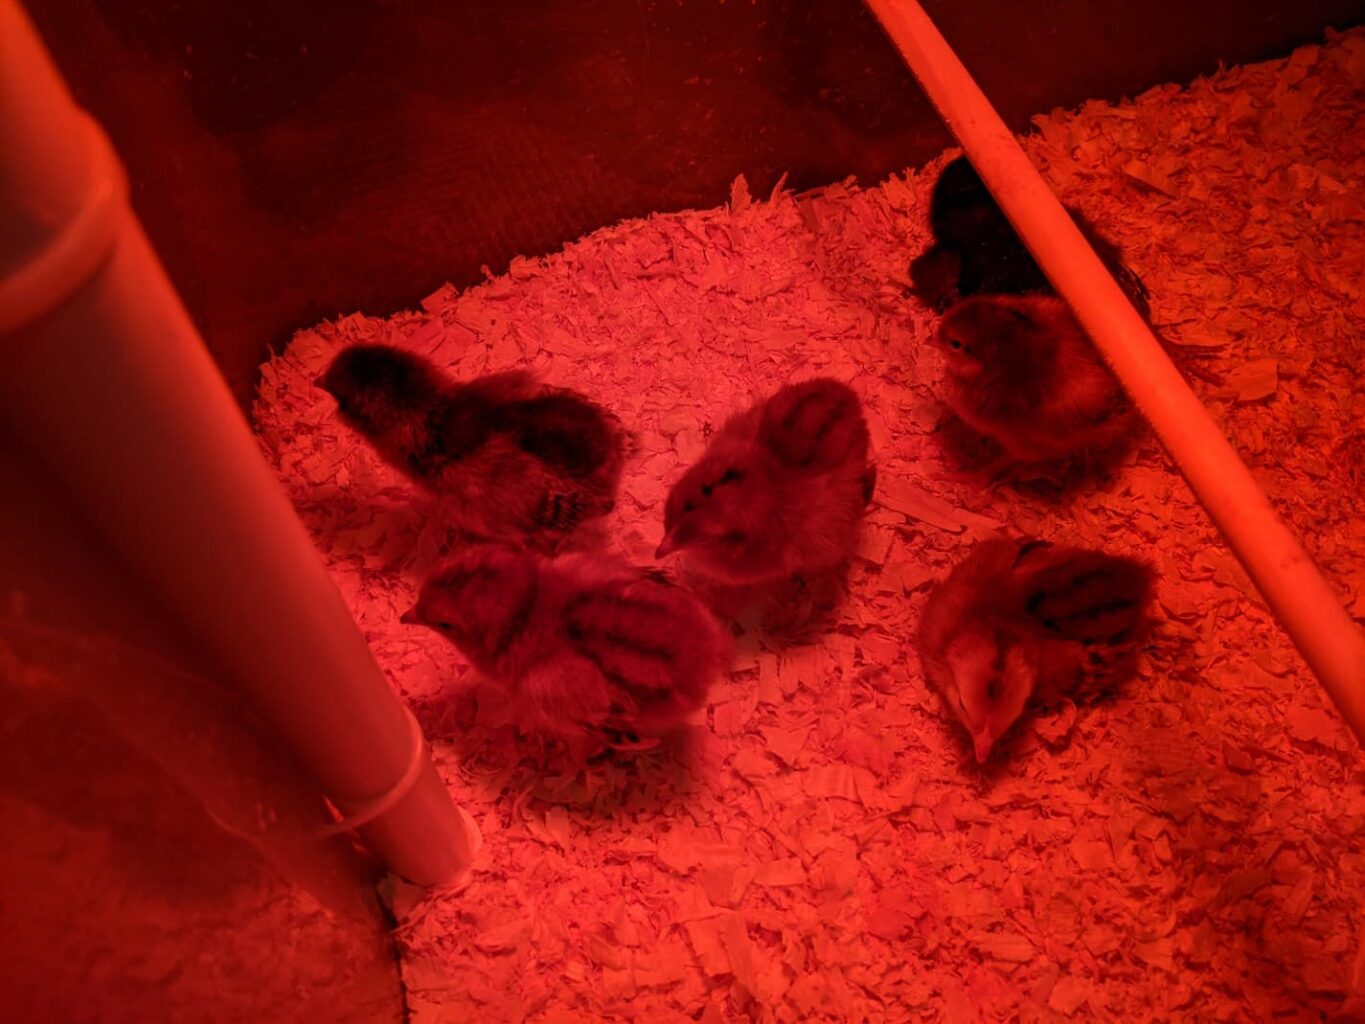
When the temperature is too low your chicks would most likely huddle together near the heat source.
Your chicks may also be quite noisy, as this is an indicator of their distress. They might even pile up and appear like they are smothering each other, in an attempt to warm themselves up. This particular behavior would most likely occur at night when the room temperature drops, so make sure you check in on your chicks before you call it a night and increase the heat if necessary.
You can increase the heat by lowering the heat source by a couple of inches, increasing the wattage of your bulb, or increasing the temperature on the thermostat.
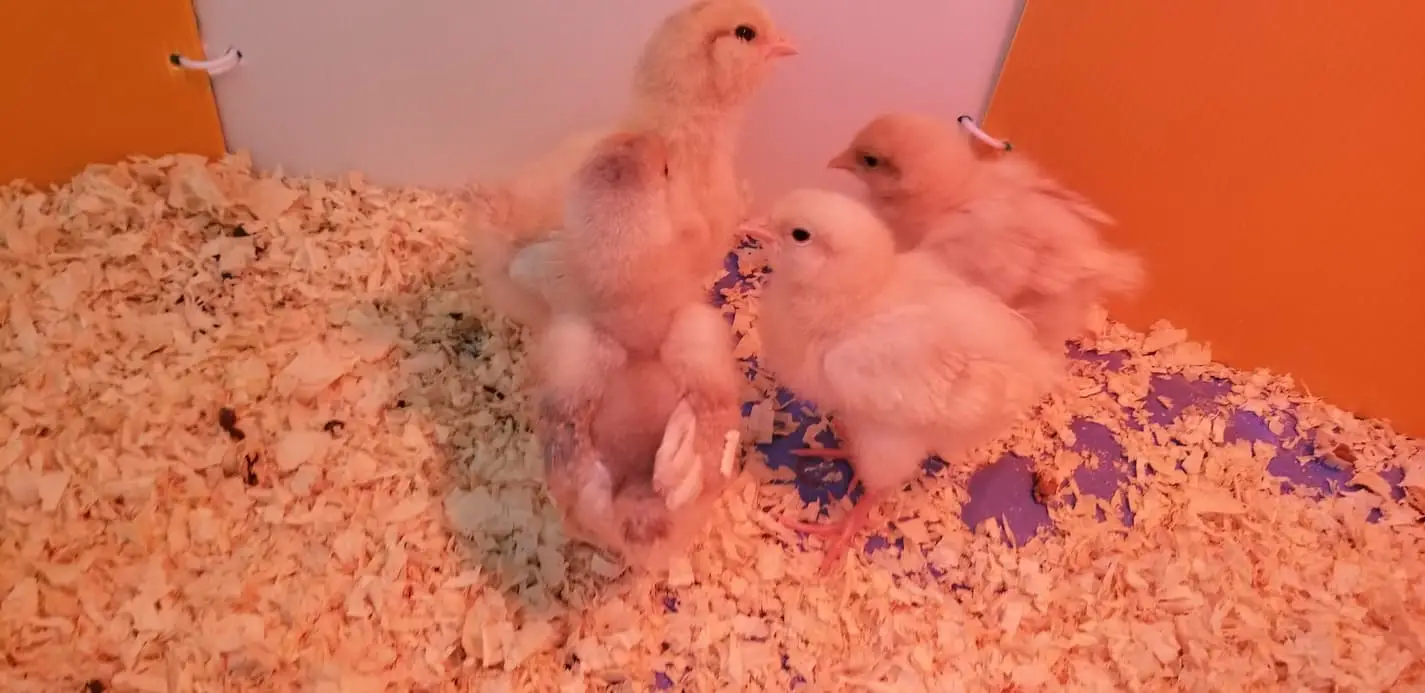
When the temperature is just right, your chicks are happy and it’s so stinking cute.
Chicks that are warm would let out contented peeping sounds and wander around freely, merrily drinking and eating. They would rest comfortably, sleeping side by side with each other, and it can be a very pleasant scene to watch.
Seriously. You don’t need the thermometer. Just watch your chicks.
Heat Lamp – Is It Needed?
Heat lamps would NOT come at the top of my recommendation list for your brooder. I say this not because they’re inefficient, but because even when carefully used they are still potential fire risks. My friend’s family lost all of their chicks and their house suffered fire damage from a heat lamp that exploded. And lest you think it was due to negligence… she’s a nurse and she’s married to a firefighter. They took all the right precautions.
This heat source is very affordable but also extremely dangerous. Your heat lamp falling into your cardboard brooder or chick bedding, a feather or bird flying up into it, accidentally knocking your heat lamp over, and so much more can spell disaster for any chicken keeper.
If you must make use of a heat lamp, ensure you install it with a porcelain or ceramic socket. Don’t use a plastic one as it can get quite hot – and plastic can’t really withstand heat. I’d also use some kind of an actual lamp holder to hold the heat lamp in place. Our original brooder used a PVC pipe and hook to hold the heat lamp in place. That worked well enough, mostly because the hook kept the lamp away from the plastic pipe.
Also, use wire to protect things. Think about placing chicken wire or hardware cloth over your brooding box. That way, it’s protected from a falling lamp. Or bend some stout wires across the front of your heat lamp. This would drastically reduce the incident of your heat lamp falling directly into your chick’s bedding (and starting a fire).
The heat lamp we used (purchased from IFA, my favorite local feed store) came with a wire guard across the front of the bulb already. It also came with metallic housing for the bulb. That way, we could hang it on the PVC pipe and hook it more safely.
You should make use of these preventative measures regardless of whether your heat lamp has an inbuilt guard or not. An adjustable chain should also be used to hang your heat lamp up.
If the idea of a heat lamp stresses you out for the potential for fire, please don’t feel bad about that. Go ahead and get a safer heating option (we’ll talk about those in a bit). And seriously – don’t feel bad. We aren’t using a heat lamp anymore, either.
How Long to Use a Heat Lamp?
The amount of time you’ll need to employ the use of a heat lamp depends on the ambient temperature of the room you set up your brooder in. A room temperature around a temperature range of 75℉ (24℃) would not need a heat lamp past the fourth week. And even that’s a stretch.
We generally used the heat lamp 24/7 for the first week or two for our indoor brooder. Then, after that, we slowly started backing it off and turning it off for more and more time until the chick didn’t need it at all. Our goal was to minimize the amount of time they needed it. Because, you know – it’s a fire hazard.
If you’re brooding your chicks in cooler conditions, such as in a garage or a room with a temperature of about 60℉ (16℃), then you will probably need to make use of your heat lamp until the sixth week.
Setting Up a Heat Lamp
Before we dive right into how to set up a heat lamp, please note that making use of two lamps would go a long way in safeguarding you against burnouts in the middle of the night, so if one lamp goes out you can rest assured that that other one would warm up your chicks until morning. But then that also doubles your risk of problems with heat lamps. So it’s a risk you’ll need to weigh in your decision-making process.
To set up your heat lamp, you don’t really need to do much. Even so, here are a few steps to take to ensure that your heat lamp is set up efficiently and safely.
- Make sure the wattage of your bulb provides sufficient warmth for your chicks. In warmer weather conditions a 150-watt bulb should do just fine, in cooler conditions you would need to install a 250-watt bulb. But use the lowest wattage possible, as all that light does create heat.
- Find a secure way to rig up your heat lamp. You can do this by making use of the clamp that comes on most heat lamps. You can pass an adjustable chain through it or you can create a little bracket coming out from the wall.
- Regulate the heat your lamp emits by raising or lowering it – or by reducing the wattage of your bulb. General practice for regulating your heat source by raising and lowering is to start off by placing your heat source 18 inches above your chicks, then raising it about 3 inches every week.
If you don’t want to buy a thermometer, remember to watch your chicks’ behavior to help you see where to place the heat lamp. And if you get a thermometer? You still need to watch your chicks’ reaction to the heat. Because if they’re acting too hot despite the chart saying it should be at that temperature? Raise the lamp, friend. Help your chicks stay comfortable. Chick behaviors trump thermometer readings every time.
Best Heat Lamps and Heaters
The heat lamps listed below have great reviews and spectacular features that would make brooding easy and efficient. I’ve listed them in the order that we’ve used, researched, and considered them.
If we were to brood chicks today, here’s what we would use: either the Brinsea EcoGlow Brooder (on Amazon) or the Cozy Safe Chicken Coop Heater (also on Amazon).
The mechanics of this heat source is quite different from that of traditional heat lamps. The Brinsea EcoGlow Brooder is quite popular amongst homesteaders and operates by keeping chicks warm while they are underneath it, its mechanics basically emulates that of a mother hen warming up her chicks. It doesn’t warm up the air in the brooder though.
A lot of homesteaders believe the EcoGlow brooder is much more suitable for backyard chickens. It’s not a fire hazard, it uses less electricity and its height is easily adjustable and it poses no risk of overeating your chicks. This product emits radiant heat, this is what enables it to warm just your chicks up and not the environment. Radiant heat waves are able to pass through air without warming it up, and they can only warm-up solid objects.
We don’t have the Eco glow brooder yet, but it’s on my to-buy list for our next brooder. Assuming we don’t let the chickens go broody, of course.
A coop heater (sometimes also called a sweeter heater) is also just as popular as an EcoGlow Brooder. It possesses an internal thermostat and distributes heat uniformly across your brooder. It’s also durable, energy-efficient, and easy to set up. We have this exact heater for use in our coop any time the weather gets too crazy. We only use it if there’s a severe swing in temperature, but our chickens love it.
If you’d like to use the same lamp and bulb we used to use, then make sure you check out the Woods Clamp Lamp with Reflector and Bulb Guard (available on Amazon) with the Incandescent R40 Reflector – Clear Head Lamp (click here to see it on Amazon).
The Woods Clamp Lamp is a versatile option. This heating source can be used in various locations and is super easy to install with its inbuilt clamp and a 6-foot cord. This product can take an electrical power of up to 300 watts and supports e26 porcelain bulbs. It is also more efficient for lighting and heating due to the 10-inch aluminum reflector it comes with.
The Incandescent R40 Reflector – Clear headlamp lasts 5–6 times longer than a regular incandescent bulb. It consumes approximately 250 watts of power and has a red light that would ensure your chicks are not unnecessarily stressed. We used one bulb for multiple seasons of brooding chicks.
If I were going to do a heat lamp in the future, I’d consider replacing the generic heat bulb with the OMAYKEY 2-Pack Ceramic Heat Lamp (click here to see pricing on Amazon). This pair of bulbs do not emit light but rather infrared radiation, which does not affect the sleeping pattern of your chicks. It is relatively easy to install, just make sure the socket you are screwing it into is a porcelain or ceramic one. The OMAYKEY Ceramic heat lamp emits 100 watts while working between 90 – 120 volts and consumes relatively low power. It also comes with a digital thermometer which is kind of cool.
Setting up your brooder the first time can get pricey, depending on how you do it. If you need to go for a less expensive option for your first go with chicks, don’t feel bad. There are often people on online classified sites (like Craigslist) who are selling old brooders and equipment they no longer need.
But if you’re going to be taking care of chickens? I highly recommend you get good equipment. It will last longer, do better, and be a much safer option for your backyard homestead in the long run.
Do Chicks Need Light at Night?
In general, chicks only need light during the daytime unless the light is also their heater source. So the answer is a qualified yes and no. Chicks can do without light at night but the duration mustn’t be too long, especially during their first couple of days.
It’s also ok to give young chicks 24 hours of light. It’s also ok to allow them to experience dark periods in order to get them accustomed to the darkness. But keep these periods brief to start, maybe an hour and 30 minutes tops.
Dimming the lights in your brooder is also an ok alternative to turning the lights off. From my research, it may help to control cannibalism.
That being said, we didn’t turn off the heater lamp at all until our chicks were okay going without the heater for a while at a time. Then we built them up to going without the heater during the daytime. We eventually quit using it altogether. Now, we also got a light for the heater lamp that was supposed to be fine being on for 24 hours a day – without messing with the chicks’ day and night cycles.
Can Chicks Get Too Warm?
Yes, it is possible for your chicks to get too warm. As I explained under the subheading on measuring heat and light without a thermometer, you would know when your chicks are too warm from their body language. Here’s a quick recap of the “too warm” body language.
Chicks in extremely warm conditions would stay as far away as they can from the heat source. You might notice that their heads are drooping or that they are panting. They can also develop pasty butt, diarrhea, or become dehydrated.
The humidity and ventilation of the room you decide to brood your chicks in are also important. Proper ventilation helps maintain an adequate relative humidity of 50 – 70%, regulate the room’s temperature, and maintain wholesome environmental conditions.
If the relative humidity of your brooder falls below 50% then you’re at a higher risk of a serious problem.
Poor ventilation plus low relative humidity equals high microbial activity in your chicks’ feces. This then leads to high ammonia levels in your brooder, which in return has a few side effects. High ammonia levels deteriorate the immune system of your chicks, impair their growth rate, and make them more susceptible to respiratory diseases.
A high dust level in your brooder is usually an indicator that you need to ventilate the room. You can clean your brooder regularly and employ the use of a fan to achieve this.
Pro tip: if you have a cat or other large animals, make sure that you don’t just leave the brooder out in an attempt to keep it well-ventilated.
We installed chicken wire across the top of our plastic bin brooder to help keep it ventilated and safe from our cat Ginger. We also had to keep an eye on our dog Kai – because he’s a bird dog, even if he’s not been trained as such.
Keeping Chicks Warm without a Heater
To many, this might sound improbable but there are quite a number of things you can do to keep your chicks warm without employing the use of a heater. To be more specific, there are four things you can do and you’ll find them below.
Tip #1: Use a broody hen to keep chicks warm
This tip is my favorite and just as effective as using a heater. You can introduce a broody hen to your chicks to play as their surrogate mother. To efficiently do this you’ll need to prepare and encourage one of your broody hens or a hen that has gone broody.
You can do this by discreetly placing eggs underneath her. They don’t even have to be real or fertile eggs. Doing this would just help you figure out whether she’s ready to play your chick’s surrogate mother.
If she diligently sits over the eggs without any fuss, then you’d know she’s ready for the job. You can go ahead and buy your chicks. Once you’ve gotten your chicks, show them to your broody hen one after the other. You may need to sneak them under her when you swap out the fake eggs.
Your broody hen will most likely do a fine job in regulating your chick’s temperature, protecting them, and teaching them how to forage for food.
Tip #2: Use enough brooder bedding to keep chicks warm
You can also warm up your chicks by adding more shavings or other bedding material to their brooder. Please use pine shavings instead of cedar shavings, the latter shavings are too large and quite toxic to chicks. Your chicks can keep themselves warm by burrowing into the shavings.
Tip #3: Order enough chicks for snuggling
Chicks can also keep themselves warm by huddling together. This is why a box of chicks can survive being shipped in the mail. For this, to work you have to order enough chicks, though. Some experts say that “enough” means 25+ chicks.
In my experience, we do 6 chicks at a time. And in a small brooder with plenty of bedding, they do just fine.
Tip #4: Upcycle an old feather duster into a warming station
Feather dusters can also help provide warmth to your chicks. They warm themselves up with a feather duster by cozying up to it like it’s their mom.
Feel free to mix and match these tips for the best possible outcomes. Using one alone may not be enough.
Final Thoughts on Chicks, Light, and Heat
We hope we’ve been able to efficiently cover the light and heat requirements for raising baby chicks. Make sure you have your brooder ready before you order your chicks online or go out to buy them.
Or if you’re impatient like me when we bought our first set of chicks, at least buy the brooder supplies when you buy your chicks. Then set it up ASAP. Most stores that sell chicks will send you home with them in a little box (with air holes, so don’t worry). Leave your chicks in that box and sit on someone’s lap until you can properly heat up the brooder. Then keep an eye on them to make sure they stay warm enough after the transfer.
Drafts are also something you don’t want in your brooder, so ensure there are no areas where the air is whistling through. It is important you remember that the temperature requirements of your chicks depend on their breed, this is why you need to make sure you identify whether you’re raising layers or broilers before subjecting your chicks to certain temperature grids.
But if you don’t know the breed? Don’t worry. Watch their behavior. That will always be the gold standard for knowing how they’re doing.
If you happen to rescue a bunch of chicks and are quite flustered about what to do to get them warmed up, don’t forget to employ one of the tips we gave under the subheading on how to keep chicks warm without a heater. Most of the tips listed here are perfect for impromptu situations like this.
Raising chicks really is an amazing experience, though. And once you know the golden rule about a chick’s behavior to stay warm enough? It really is a lot easier to be confident in raising them. So hang in there, friends.
Oh, and here are some more articles I’ve written to help you keep going in all of your chick research. Because you will wonder about why chicks lay on their sides and how to keep chicks’ water clean. So make sure you read those articles next.
Resources
Learning from your own experience is essential, but learning from others is also intelligent. These are the sources used in this article and our research to be more informed as homesteaders.
- “Bulletin #2227, Maine Poultry Facts: Lighting For Small-Scale Flocks – Cooperative Extension Publications – University of Maine Cooperative Extension.” Cooperative Extension Publications, extension.umaine.edu/publications/2227e/.
- Ogden Publications, Inc. “Chick Brooder Temperature and Light Requirements.” Mother Earth News, www.motherearthnews.com/homesteading-and-livestock/raising-chickens/raising-chicks-brooder-temperature-zebz1305zstp.
- Singh, Manpreet, et al. “Biosecurity for On-Farm Pathogen Control in Poultry.” University of Georgia Extension, 1 Apr. 2020, extension.uga.edu/publications/detail.html?number=B1287&title=Environmental+Factors+to+Control+when+Brooding+Chicks.
