People like the idea of freeze-drying at home, but freeze-dryers are expensive. If you like the idea of freeze-drying but are daunted by the high price, you might wonder – is it safe and easy to make a freeze-dryer at home?
There are many ways to make a freeze-dryer at home, but there is no guarantee it is safe unless the DIYer is experienced and perhaps a machinist. Furthermore, the results from a homemade freeze-dryer probably won’t be as good as when using a professional machine.
Freeze-drying is the best way to prepare food for long-term storage because it can last up to 25 years.
Technically, anyone can make a freeze-dryer at home, but they must invest their time and money to create one. So, if you’re curious about home freeze-drying and wondering how safe it is to make a freeze-dryer at home, we’ll tell you everything you need to know below.
How Does a Freeze-Dryer Work? (Home Built or Not)
Freeze-drying uses temperature and pressure to preserve food by using alternating cycles of freezing and drying within a vacuum to remove up to 99 percent of the moisture. Thus, freeze-dried food retains its original flavor, nutritional content, and texture.
We need to review the science behind freeze-dryers so that you can better understand how to build a DIY freeze-dryer. I highly recommend that you also review the full post on the science behind freeze-drying: How Do Home Freeze Dryers Work? Science and Process Made Easy.
Or if you’re already familiar with the science, here’s the quick version.
Freeze-dryers use a process called sublimation to remove moisture from food. Unlike regular freezing, freeze-drying won’t affect the food’s structure or nutrients and can be stored for longer.
When freezing food, the water in the food expands and damages the cell walls. It alters the texture and consistency. Food can be safely stored for a maximum of 12 months in a freezer – sometimes less, depending on the food.
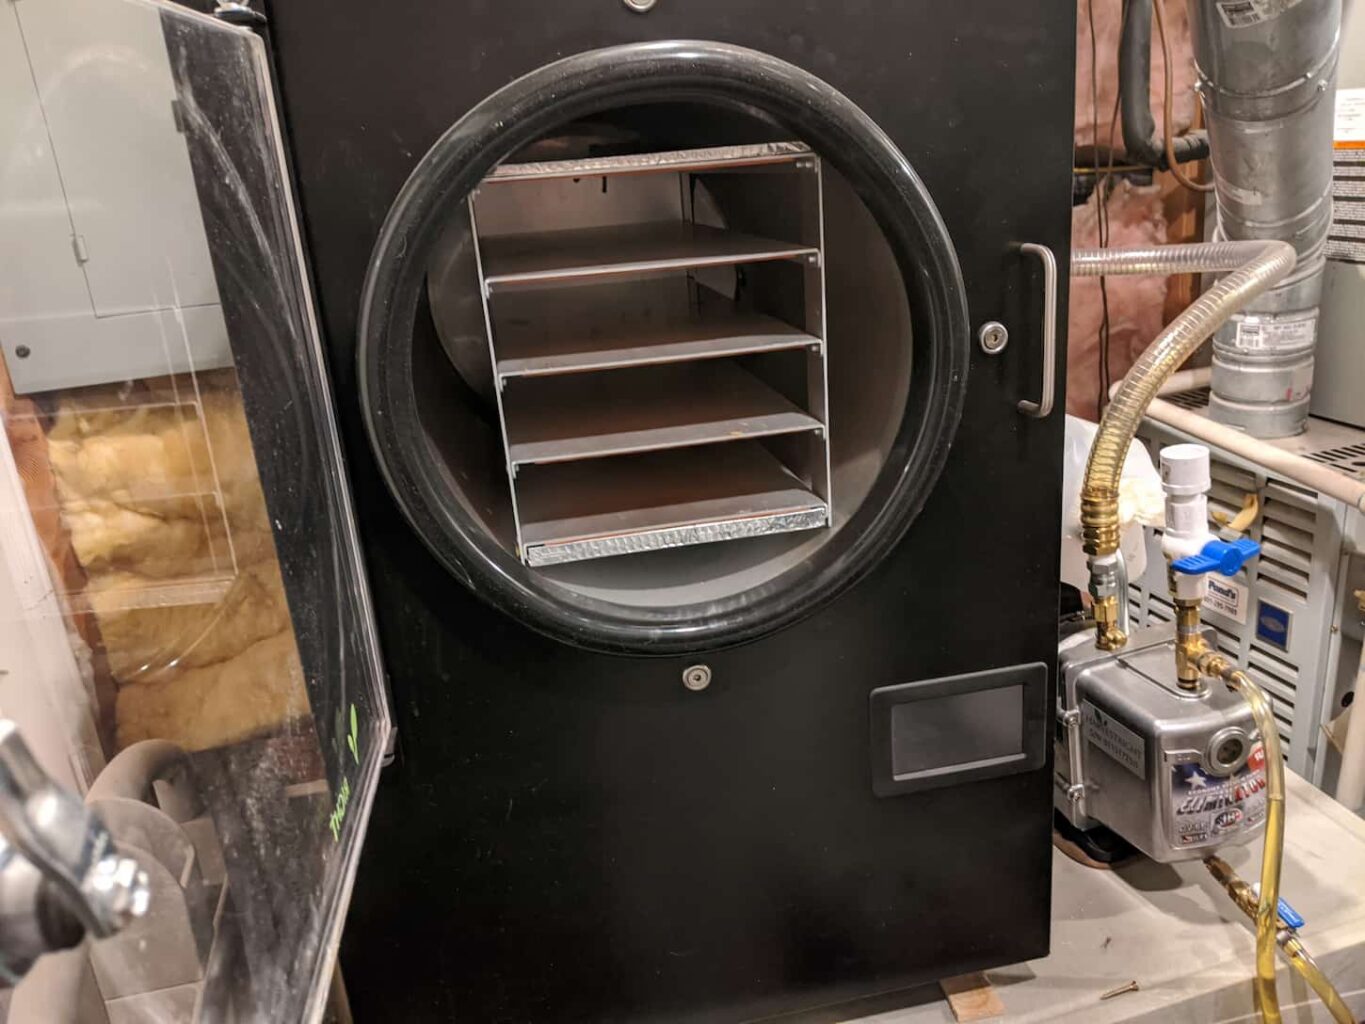
The structure of a freeze-dryer is quite simple – it has a central chamber, a water-cooling chamber, and a vacuum pump. In the vacuum chamber, food freezes quickly, so the ice doesn’t expand, and then it’s gently heated.
The low pressure and the temperature in the chamber mean the water in the food turns directly into moisture; this is known as sublimation.
Can you Make a Freeze Dryer at Home?
Technically anyone can make a freeze-dryer at home, and there are many methods to choose from. Some ways are more technical, but homemade freeze-dryers rarely achieve the results of a professional freeze-drying machine.
People who enjoy building things, understand mechanics, and have a well-kitted-out workshop might find it easy to make a homemade freeze-dryer. For those who aren’t mechanically inclined, there might be a struggle to create a safe homemade freeze-dryer that works.
Some of the videos I’ve seen online (usually on YouTube) showcase an amazing array of talented builders. The ones who build the best-looking units at home usually have machining skills and tools to craft a better-functioning unit that looks like it’ll actually last more than 1 to 2 batches.
What Tools Do You Need to Have to Make a DIY Freeze-Dryer?
The tools needed to construct a homemade freeze-dryer are different for each method. For example, some freeze-dryers only need essential tools such as a wrench and drill; for others, more specific items such as a drill press are helpful.
We don’t necessarily need lots of tools to make a freeze-dryer at home, and we can find that most of the tools required are available in our tool shed. Except for the drill press. We don’t have one of those as we haven’t needed it.
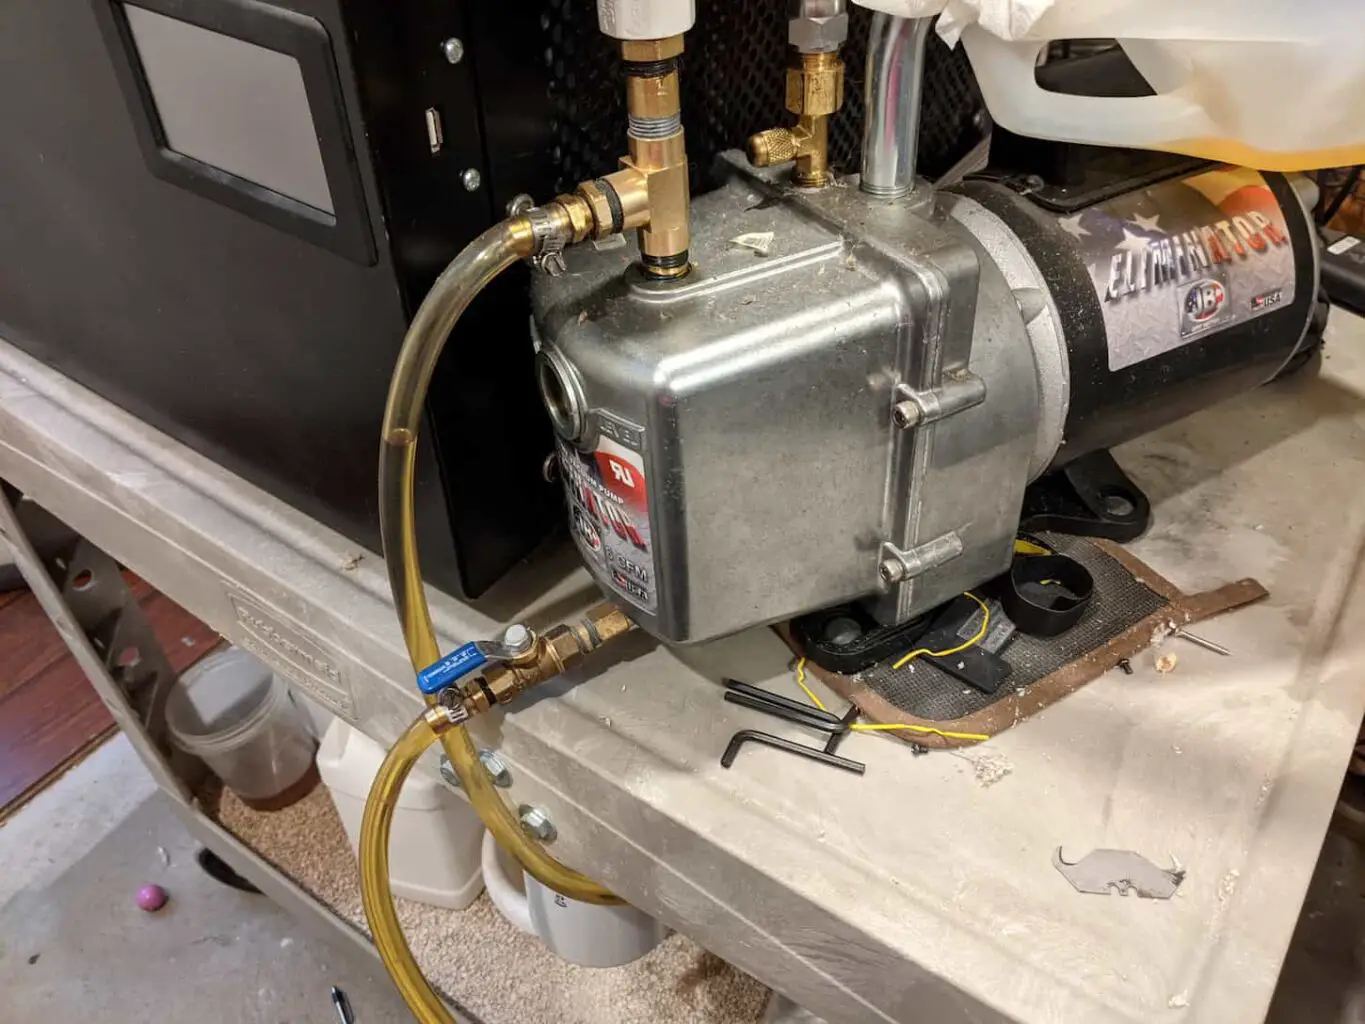
Most homemade freeze-dryers run off an industrial vacuum pump. For the best results, a high-powered pump is essential. A domestic vacuum won’t lower the pressure enough.
How Do You Make A Freeze Dryer At Home?
A basic homemade freeze-dryer using a vacuum pump and a regular freezer can be made at home. This method involves little construction, but the results aren’t that great. Construct a machine that uses chambers, a vacuum pump, and dry ice for the best results.
Many methods can be found online for building a homemade freeze-dryer, but not all are safe, and some don’t even work.
So, after a long search on the internet, here are the three methods we think are the safest and most reliable for those who want to build a freeze-dryer at home.
When it’s reasonable to do so, I’ll include links to relevant products so you can see what they look like, along with current pricing on sites like Amazon.
DIY Option #1 – With ready-made vacuum chambers
For this method you need:
- 1-quart pot vacuum chamber
- 1-gallon pot vacuum chamber – here’s a 3-gallon one on Amazon
- 2-gallon pot
- Styrofoam sheets – like these ones on Amazon
- Rotary 2-stage vacuum pump – this one on Amazon looks decent
- Glue – Gorilla glue (on Amazon) would be my go-to choice here
- Epoxy – grab the good stuff on Amazon here
- Teflon tape – here is an option on Amazon with 4 rolls
- ⅝ inch braid reinforced tubing – here’s a link to all sizes of reinforced tubing on Amazon
- ⅝ inch barbed splice
- ¼ inch union
- Drill and spade bit
- Cryo Fluid
- Pressure gauge – like this one on Amazon
This is a fairly straightforward method for a homemade freeze-drying machine – we don’t need special tools or a mechanical mind to create it. Use purpose-made vacuum pots as the chambers and styrofoam sheets to insulate them.
Then, use dry ice and a vacuum pump to get the correct pressure and temperature in the chambers.
A few adaptations will need to be made to the purpose-made chambers – we need to add a better pressure gauge and connect the two pots with hoses.
The pressure gauge included with the pots isn’t very effective, and to get the correct pressure, we’ll need to replace it with a high-quality, digital one.
Once the machine is ready, use cryo fluid and dry ice to keep the water trap chamber cool. During freeze-drying, keeping an eye on the freeze-dryer and adding dry ice every hour is critical.
It might take a few practice runs to get the hang of using the machine, but once you get it right – the results are pretty impressive.
Overall, this method requires little technical input, and it is one of the safer options available.
DIY Option #2 – The technical method
For this method you need:
- Dry ice
- Digital vacuum gauge – like this one (on Amazon)
- 8×8 half-inch thick aluminum plates
- Drill press
- Drill and lots of different drill bits
- Glue – I’d recommend Gorilla glue or some other strong glue
- Teflon tape – like this via Amazon Marketplace
- Dry ice
- Hose clamps – here’s a good-sized bag of them on Amazon
- Rubber gaskets
- Sandpaper
- Wrench
- Reinforced wire mesh tubing – like this option on Amazon
- 2 thick glass bowls
- A large metal bowl
- Styrofoam sheets – like these bulk packs on Amazon
- Expanding foam
- Lots of nuts, bolts, and washers
- High-pressure vacuum pump – like this one on Amazon.
- Vacuum connectors
As we can see from the list of materials, this method is pretty technical, and we need special tools to construct it, such as a drill press. It uses glass bowls with rubber gaskets as chambers. These are attached to a purpose-built aluminum and steel frame.
The main chamber sticks to an aluminum plate through suction from the vacuum, and the water trap chamber sits in an insulated metal bowl. Then, connect the two with tubing and attachments and add a digital pressure gauge.
Like the first method, use cryo fluid and dry ice to keep the water trap container cold, check it every hour, and add dry ice as needed. This is a fantastic method for people with a mechanical mind and lots of tools, but it’s a lot of work for someone who doesn’t understand mechanics.
DIY Option #3 – With a wine pump and vacuum container
For this method you need:
- Vacuum Chamber – A vacuum food container
- A wine pump that fits your vacuum container – here’s what they can look like on Amazon
- A separation bowl
- Calcium chlorate
- Dry ice
This method is the simplest one on the list, and we’ll use a wine pump to reduce the pressure in a standard freezer. We’ll also use a desiccant, which absorbs and draws moisture from food to help it dry.
First, we need to half-fill a vacuum food storage container with a desiccant, such as calcium chloride – we need at least double the weight of the items you want to freeze-dry.
Next, put a separation dish for the next layer to keep the desiccant away from the food – calcium chloride is safe to consume, but it makes food taste bad. Make sure to leave space below the separation dish because the calcium chloride expands as it sucks up moisture.
For the next step, flash freeze food items between bags of dry ice before putting them in the top part of the container – then seal it and pump the air out.
Finally, put the container in the coldest part of the freezer and leave it for 24 hours. Pump the air out again after a day and then leave it for a week – or until it’s dry.
This is a simple method, and it’s easy to get hold of the parts, but it probably won’t freeze-dry the food enough for long-term storage. The wine pump removes some of the air but is nowhere near as powerful as a vacuum pump.
Is it Safe to Make Your Own Freeze-Dryer at Home?
The safety of homemade freeze-dryers depends on the quality of their construction. A poorly built freeze-dryer can be dangerous, and even if it is a well-constructed homemade freeze-dryer – there’s no way to guarantee its safety over time or repeated usage.
To build a freeze-dryer safely, we need to understand construction and the science around freeze-drying. With most homemade freeze-dryers, we have to use dry ice and cryo fluid which can be volatile and even explode.
Dry ice can also burn the skin, so we must also be careful when handling it – always wear gloves and long sleeves.

How Much Does a DIY Freeze-Dryer Cost?
Making a freeze-dryer at home costs anywhere between $200 – $400, and the price will increase if any special tools need to be purchased.
The most significant investment when someone decides to make a freeze-dryer is the vacuum pump, usually between $75 – $200. Vacuum chambers can cost between $80 – $150.
A digital pressure gauge will set you back $50 – $100. We’ll also need a good supply of dry ice and cryo fluid to run our homemade freeze-dryer.
Note: if you’re going to buy a drill press or any other important tools for building your DIY freeze-dryer, please be sure to buy quality tools or do some serious research before buying them from any discount tool store.
The short version of our personal or family rule for buying tools is this: could this tool cause us serious harm if it malfunctions? If so, it’s best to get a quality tool with a good name-brand behind it to better ensure our personal safety. And we’ll get the proper safety equipment to go with it, thanks.
How Long Does a Homemade Freeze-Dryer Last?
A well-made home freeze-dryer might last a few years, but on the other hand, it might only last for a few runs. Homemade freeze-dryers don’t go through testing or quality control, so there’s no way to tell how long they will last without doing the testing on one’s own.
A professional freeze-dryer might seem like a considerable investment, but it can potentially last a lifetime with regular maintenance. Commercial freeze-dryers have been through rigorous testing, so they’re durable, hard-wearing, and, most importantly, safe.
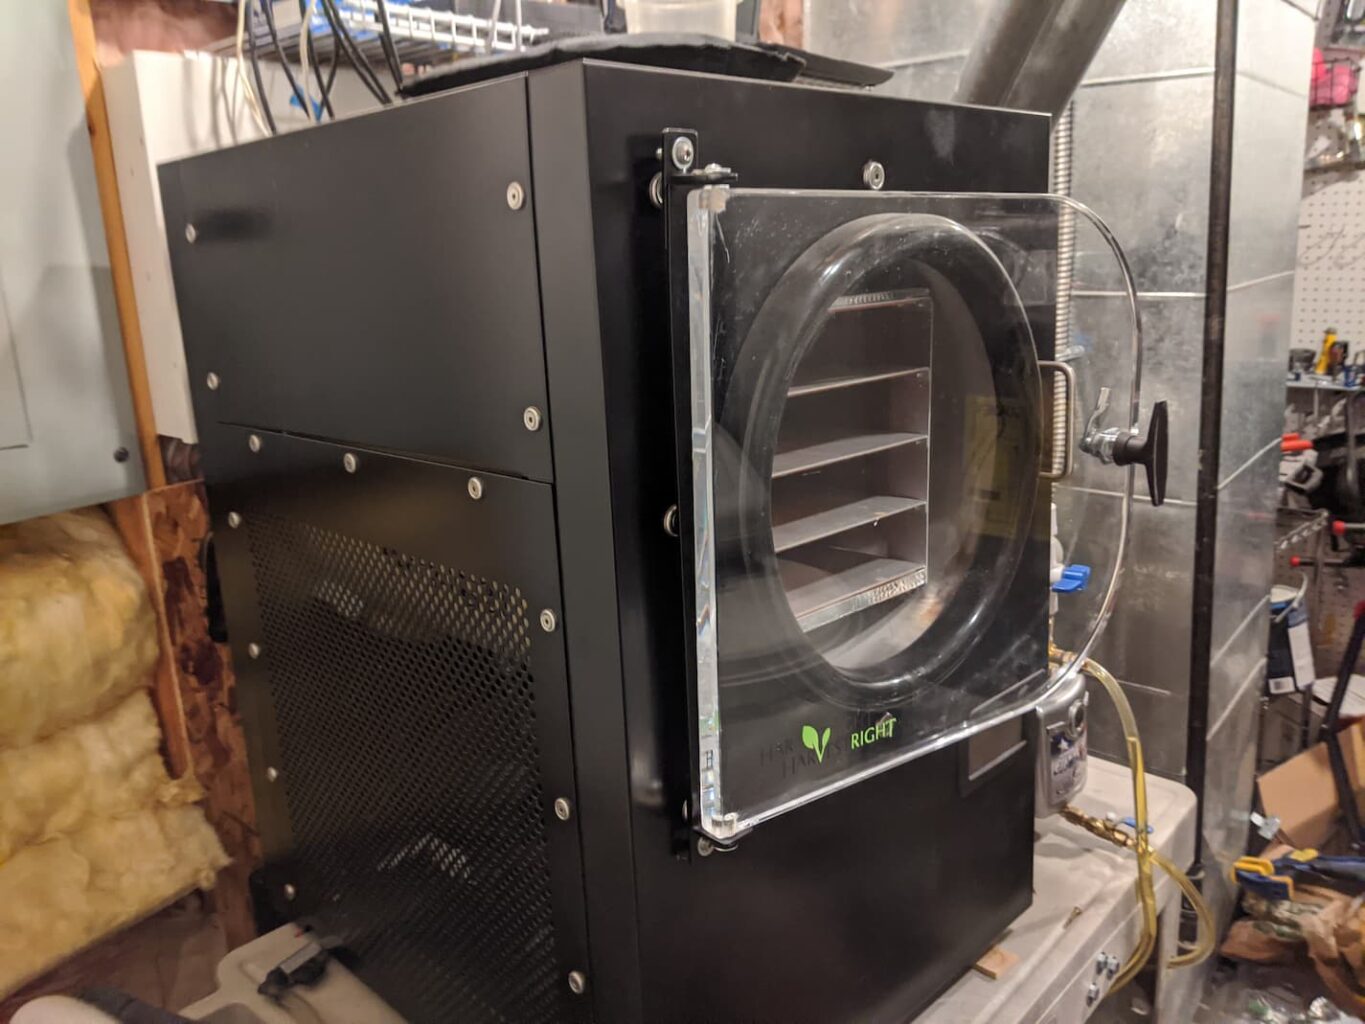
Most home freeze-dryers, such as Harvest Right, also have a warranty. And they’ve been through all the crazy quality and endurance testing, which is nice for that whole peace of mind thing.
How Long Does Food Made in a DIY Freeze-Dryer Last?
The results of home freeze-drying vary, but in most cases, the food will not last as long as food that is done in a professional freeze-dryer, which is up to 25 years. It’s hard to get the temperature and pressure precisely right with home freeze-dryers, and often the results are disappointing.
All the moisture must be removed to store freeze-dried food safely for a long time because it will perish faster. The thing with homemade freeze-dryers is that they might not remove all the moisture because they’re not as powerful.
Freeze-drying is a science, and the conditions must be suitable for sublimation.
We can tell when food is thoroughly freeze-dried because it will be completely brittle when we snap a piece off, and there should be no cold or damp patches. If the food is soft or damp, it won’t keep for very long in storage.
Most of the DIY freeze-dryers made in various videos don’t do much reporting on how well the food actually stores and is usable after being processed. That silence, to me, speaks volumes – or is at the very least concerning.
In other words, most of the builds seem more concerned with being able to get the job done – and not actually being built for long-lasting freeze-dryers that can be duplicated by other builders.
Which is Safer: A Harvest Right or a Homemade Freeze-Dryer?
The safest way to freeze-dry food at home is with a Harvest Right freeze-dryer. These are robust machines that have been through rigorous testing – so they can guarantee safety. Not only is the Harvest Right safer, but it will also produce perfect results every time.
Unless we’re scientists or engineers who know how to build a machine correctly, homemade freeze-dryers may compromise our safety. If we want a safe home freeze-drying machine, it’s better to choose one made by experts.
Harvest Right is the leading brand when it comes to home freeze-drying machines. They are who I picked for our freeze-dryer, and Harvest Right is who I recommend to anyone who’s looking to buy a freeze-dryer for use at home. You can use this link to go shop current sales on their site now.
Would you like to know more about how easy it is to freeze-dry food for storage at home? Read this excellent article I wrote to find out: How to Freeze Dry and Store Your Favorite Foods: Guide with Pictures.
Best Products For Homemade Freeze-Dryers
During my research for this article (and to see if I dared make my own freeze-dryer), I came across some good options for parts. Here’s a list of parts that you may want to use, or at least use as a reference as you price out making your own DIY freeze-dryer.
Insulation Parts
- Styrofoam can be a great way to insulate. These 8 and 16 packs of styrofoam sheets on Amazon can be a great budget way to insulate your DIY freeze-dryer.
- This vacuum-sealer, airtight food storage container option on Amazon (with lids) may only end up being ideal after the food is freeze-dried, but they sure look nice! And they may end up working for the DIY freezer, too.
Vacuum Pump Options and Parts
- This Robinair vacuum pump looks decent – in both performance and price. It’s on Amazon.
- You’ll want a digital pressure gauge, like this one on Amazon. You may be able to find it locally.
- A wine pump, like this one on Amazon, though you will need to make sure it’s got a container it fits with.
Freeze-dryer Parts
- Vacuum Chamber – You’ll need a vacuum chamber, like this 3-gallon one on Amazon.
- Reinforced vinyl tubing is always a must. Here are some different-sized options on Amazon.
- Teflon tape is a must for many projects. Here is a decently-priced option via Amazon.
- Epoxy is also great to have on hand. Pick how much you want with these various sizes and 2-packs on Amazon.
- Gorilla glue is a great option for glue because it’s temperature resistant. Just make sure that any glue that could touch food is rated as food-grade safe.
- You can never have enough hose clamps (like these on Amazon) on hand. Just get the big bag to keep on hand.
Key Takeaways and Next Steps
If we want the best results from home freeze-drying, we should choose a purpose-made home freeze-dryer from Harvest Right.
We can make a freeze-dryer at home for a fraction of the cost, but generally, homemade freeze-dryers range anywhere from unsafe and unreliable to less-safe and less reliable. They may last anywhere from single-use to several years if we’re lucky.
Our Harvest Right, on the other hand, is more than 5 years old and it’s chugging along nicely. It’s still working like it did when it was brand new. Personally, this is one of those times when I’m glad we didn’t attempt a DIY version. I’m very pleased with our investment in this equipment.
A Harvest Right freeze-dryer might seem like a significant investment, but it can potentially last a lifetime. If you’re looking for a serious solution to long-term food storage, it’s worth investing in a Harvest Right home freeze-drying machine. If you’re shopping for one, here’s the link to their site again.
They usually do some great sales from time to time, and their layaway program is singularly unique. You can read the article I wrote on how their layaway program works here.
Are you interested in learning more about freeze-drying and storing foods correctly at home? Read these great articles that I have written:
- How to Safely Store Freeze-dried Foods in Mason Jars (vacuum sealer)
- Complete Guide to Freeze-Drying Yogurt and Kefir
- Does Freeze-Drying Foods Kill It? (Bacteria, Virus, Nutrients, Enzymes)
- How to Freeze-Dry Meat for Safe Long-Term Storage
- 79 Foods You Can Freeze Dry and 17 You Cannot: Complete Guide
Resources
Learning from your own experience is essential, but learning from others is also wise. These are the sources used in this article and our research to be more informed as homesteaders.
- Cryospain. “Cryogenic Liquids: What They Are, How They Are Obtained and What They Are Used For.” Cryospain, 10 Dec. 2021, cryospain.com/cryogenic-liquids-what-they-are.
- HowStuffWorks.com Contributors. “How Does Dry Ice Work?” HowStuffWorks, 4 Nov. 2021, science.howstuffworks.com/innovation/science-questions/question264.htm.
- Starr, Kimberly. “How Do Home Freeze Dryers Work? Science And Process Made Easy.” Backyard Homestead HQ, 6 June 2022, backyardhomesteadhq.com/how-do-home-freeze-dryers-work-science-and-process-made-easy.
- “How Long Do Freeze Dryers Last?” Backyard Homestead HQ, 18 Mar. 2022, backyardhomesteadhq.com/how-long-do-freeze-dryers-last.
- “How To Freeze Dry And Store Your Favorite Foods: Guide With Pictures.” Backyard Homestead HQ, 16 June 2022, backyardhomesteadhq.com/how-to-freeze-dry-and-store-your-favorite-foods-guide-with-pictures.
